Building Smarter White-Label Apps with Modular SDKs
Leandro Pontes Berleze | Mar 12, 2026

Traditional blockchain wallets require users to manage private keys — a major barrier to mainstream adoption. Lost keys mean lost funds, and many security incidents originate from poor key-handling practices.
In this article, we demonstrate how to build a smart wallet powered by passkeys (WebAuthn) for authentication and transaction signing on the Stellar/Soroban blockchain. By leveraging biometric authentication (Touch ID, Face ID, Windows Hello), we enable a seamless and secure user experience — without user-managed private keys.
Cryptographic key material still exists, but is generated, stored, and used exclusively inside the authenticator’s secure hardware and never exposed to the user or backend.
This article is aimed at developers already familiar with at least one of the following:
It is not a beginner tutorial, but a technical walkthrough of an existing implementation, focusing on:
A runnable PoC (Proof-of-Concept) is provided in the repository for those who want to explore the code further. The complete PoC is available on GitHub.
The main goal of this architecture is to create a smart wallet that:
This PoC assumes a semi-trusted backend that sponsors fees and controls recovery. Attackers are assumed to have network access but not control of the user device’s secure enclave. Compromise of the backend recovery key is considered catastrophic and intentionally highlighted as a non-production trade-off. This helps security reviewers instantly calibrate their reading.
The PoC is divided into three main components, coordinated by the WebAuthn flow:
| Component | Description |
| Backend | Express.js API for WebAuthn and Soroban interactions. |
| Web | React frontend for wallet operations. |
| Contracts | Soroban smart contracts (Factory + Smart Wallet). |
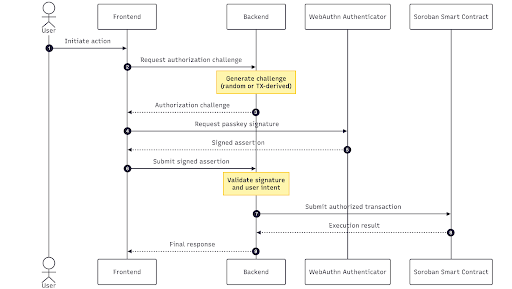
Before diving into the individual flows, it’s useful to understand the common authorization pattern shared by wallet creation, transfers, and recovery:
The authorization model presented here is not theoretical. The same core architecture — passkey-based authorization bound to Soroban transactions — is used in production in Meridian Pay. This proof of concept intentionally simplifies certain aspects (such as recovery and fee sponsoring) to focus on the core design.
Read more: Building a Global Non-Custodial Wallet on Stellar for Cross-Border Payments.
Arrow button
Backend (API Server)
Web (Frontend)
Smart Contracts
This architecture was built based on specific design decisions to integrate WebAuthn and Soroban:
⚠️ This PoC intentionally centralizes some responsibilities (fee sponsoring and recovery) to simplify UX. These trade-offs are discussed in detail in the Security & Trust Model section.
The WebAuthn protocol requires a challenge–response model to ensure security. This leads to a two-endpoint pattern for any operation requiring authentication:
This split guarantees:
| Pattern | Options Endpoint | Action Endpoint |
| Wallet Creation | GET /api/create-wallet-options/:email | POST /api/create-wallet |
| Transfer | GET /api/transfer-options | POST /api/transfer |
| Sign In | GET /api/sign-in-options/:email | POST /api/sign-in |
| Wallet Recovery | GET /api/recover-wallet-options/:email | POST /api/recover-wallet |
Wallet creation is the only moment where a new cryptographic identity is introduced into the system. From this point on, the Passkey becomes the wallet’s primary signer, fundamentally shifting wallet ownership away from a private key.
Wallet creation uses the WebAuthn registration flow to create a new Passkey and deploy the Smart Wallet.
Read more: Custodial vs. Non-Custodial Wallets: Key Differences and How to Choose
Overview (Three Steps)
Key Code: Generating Options (Backend)
The core of the registration is to generate a random challenge (for session authentication) and configure the Passkey to use the ES256 algorithm (supported by Soroban) and require userVerification (biometric/PIN).
// apps/backend/src/helpers/webauthn/registration/index.ts

async generateOptions(input: WebAuthnRegistrationGenerateOptionsInput): Promise<string> {
  // ... (setup code)

  const challenge = this.webauthnChallengeService.createChallenge();

  const options = await generateRegistrationOptions({
    // ... (rpName, rpID, userID, userName, userDisplayName)
    challenge: challenge,
    supportedAlgorithmIDs: [-7], // ES256 (secp256r1) which Soroban supports natively
    attestationType: "none",
    // ... (excludeCredentials, timeout)
    authenticatorSelection: {
      authenticatorAttachment: "platform",
      residentKey: "preferred",
      userVerification: "required", // Ensures biometric/PIN authentication
    },
  });

  // Store challenge linked to user identifier for later validation
  this.webauthnChallengeService.storeChallenge(identifier, options.challenge);

  return JSON.stringify(options);
} Code language: JavaScript (javascript)
Key Code: Validation and Deployment (Backend)
After successful Passkey validation, the backend derives a deterministic salt and calls the
deploy
method of the Factory Contract, passing the new Passkey’s public key as the initial signer and the
RECOVERY_WALLET
‘s public key.
// apps/backend/src/api/create-wallet.ts

async handle(payload: { email: string; registrationResponseJSON: string }) {
  // 1. Verify challenge resolution & create user/store passkey (similar to previous steps)
  // ...

  // 3. Derive deterministic salt from email
  // ...

  // 4. Deploy smart wallet via factory
  const args: xdr.ScVal[] = [
    ScConvert.bufferToScVal(hashedSalt),
    ScConvert.addressToScVal(this.recoveryWalletPublicKey),
    ScConvert.hexPublicKeyToScVal(newPasskey.credentialHexPublicKey),
  ];

  const { tx } = await this.sorobanService.simulateContractOperation({
    contractId: this.factoryContractId,
    method: "deploy",
    args,
  });

  // 5. Compute and store wallet address (remaining steps)
  // ...
}
Code language: JavaScript (javascript)The transfer flow uses WebAuthn authentication to sign a blockchain transaction.
Critical Difference: TX-Derived Challenge
WebAuthn is used here to authorize a specific action (the transfer), not just to authenticate a session. That’s why the WebAuthn challenge cannot be random.
Key Code: Challenge Generation (Backend)
The important part here is not the Soroban boilerplate, but how the WebAuthn challenge is generated and attached to the transaction. The transaction simulation is performed first to obtain data that will be used to generate the WebAuthn challenge.
// apps/backend/src/api/transfer-options.ts

async handle(payload: { fromWalletAddress: string; toWalletAddress: string; amount: number }) {
  // 1. Build transfer transaction args & simulate the transaction
  // ...

  // 3. Generate challenge from TX simulation (CRITICAL!)
  const challenge = await this.sorobanService.generateWebAuthnChallenge({
    contractId: this.nativeTokenContractId,
    simulationResponse,
    signer: { addressId: user.walletContractAddress! },
  });

  // 4. Generate authentication options with TX-linked challenge
  const options = await this.webauthnAuthenticationHelper.generateOptions({
    // ...
    customChallenge: challenge, // The TX-derived challenge is passed here
    // ...
  });

  return { options_json: options };
}
Code language: JavaScript (javascript)
Key Code: Validation and Submission (Backend)
After successful authentication (the Passkey signature), the backend attaches this WebAuthn signature to the Soroban transaction as an authorization entry (Auth Entry) and submits it to the network.
// apps/backend/src/api/transfer.ts

async handle(payload: { /* ... */ }) {
  // 1. Verify authentication challenge (successful validation guarantees the signature is valid for the TX-derived challenge)
  const verifyAuth = await this.webauthnAuthenticationHelper.complete({ /* ... */ });

  // 2. Retrieve TX metadata stored during options generation
  // ...

  // 3. Build contract signer with passkey signature
  const passkeySigner: ContractSigner = {
    addressId: user.walletContractAddress!,
    methodOptions: {
      method: "webauthn",
      options: {
        clientDataJSON: verifyAuth.clientDataJSON,
        authenticatorData: verifyAuth.authenticatorData,
        signature: verifyAuth.compactSignature,
      },
    },
  };

  // 4. Sign auth entries with passkey signature
  const tx = await this.sorobanService.signAuthEntries({
    contractId: this.nativeTokenContractId,
    tx: customMetadata.tx,
    simulationResponse: customMetadata.simulationResponse,
    signers: [passkeySigner], // The Passkey signature is attached here
  });

  // 5. Re-simulate, prepare, sign with source account, and submit
  // ...
} Code language: JavaScript (javascript)The sign-in flow authenticates users using their existing Passkeys without any on-chain interaction. This is purely for session authentication, unlike the Transfer flow, which authorizes a specific transaction.
Flow Comparison
| Aspect | Sign-In | Transfer |
| Challenge | Random server-generated | TX-derived |
| On-chain | No | Yes |
| Purpose | Session auth | TX authorization |
Implementation
The Sign-In flow reuses the same WebAuthn authentication helper (webauthnAuthenticationHelper) used for transfers, but with a random challenge (standard type) instead of a transaction-derived one.
Read more: The Role of User Experience in Blockchain and Web3 Adoption
The recovery flow enables users who have lost access to their original Passkey to regain wallet control by registering a new Passkey via the Recovery Account.
Flow Comparison
| Aspect | Wallet Creation | Wallet Recovery |
| WebAuthn Flow | Registration | Registration |
| On-chain Action | Deploy contract | Rotate signer |
| Signer | User’s passkey | Recovery account |
Smart Contract: rotate_signer
The critical constraint is the check that only the configured recovery account can call the method.
// contracts/smart-wallet/src/lib.rs

impl Recovery for AccountContract {
    fn rotate_signer(env: Env, new_signer: BytesN<65>) -> Result<(), RecoveryError> {
        // Only the recovery account can call this method
        let recovery = env
            // ...
        recovery.require_auth();

        // Replace the signer with the new passkey public key
        env.storage().instance().set(&DataKey::Signer, &new_signer);

        Ok(())
    }
}
Code language: JavaScript (javascript)
Key Code: Signer Rotation (Backend)
The backend validates the new Passkey created by the user, and then uses the secret key of the recovery account (RECOVERY_WALLET_SECRET_KEY) to sign and submit the rotate_signer transaction.
// apps/backend/src/api/recover-wallet.ts

async handle(payload: { email: string; registrationResponseJSON: string }) {
  // 1. Validate new passkey registration & Store the new passkey in the database
  // ...

  // 3. Prepare rotate_signer transaction
  const args: xdr.ScVal[] = [
    ScConvert.hexPublicKeyToScVal(newPasskey.credentialHexPublicKey),
  ];

  // 4. Recovery account signs the transaction (not the user!)
  const signers: ContractSigner[] = [
    {
      addressId: this.recoveryWalletKeypair.publicKey(),
      methodOptions: {
        method: "keypair",
        options: {
          secret: this.recoveryWalletKeypair.secret(),
        },
      },
    },
  ];

  // 5. Simulate and execute the transaction
  const { tx } = await this.sorobanService.simulateContractOperation({
    contractId: user.walletContractAddress, // Call the user's wallet contract
    method: "rotate_signer",
    args,
    signers,
  });

  // ... (remaining steps for preparing/signing/sending TX)
}
Code language: JavaScript (javascript)| Aspect | Implication |
| Recovery account is centralized | The backend controls the recovery key. In production, consider multi-sig or time-locked recovery. |
| User identity verification | This PoC only requires email. Production systems should add additional verification (KYC, security questions, etc.). |
| Old passkey invalidation | Once rotated, the old passkey cannot sign transactions, preventing malicious use of compromised credentials. |
Security Guarantees
This section contains all the prerequisites and configurations to run the project locally.
soroban-smart-wallet-poc/

├── apps/
│   ├── backend/      # Express.js API server
│   └── web/          # React frontend
├── contracts/
│   ├── factory/      # Wallet factory contract
│   └── smart-wallet/ # WebAuthn-enabled smart wallet
Code language: PHP (php)# Clone repository
git clone https://github.com/CheesecakeLabs/soroban-smart-wallet-poc
cd soroban-smart-wallet-poc
# Install dependencies
npm installCode language: PHP (php)The smart wallet contract must be deployed first as the factory requires its WASM hash.
cd contracts/smart-wallet
# Build the contract
make build
# Upload the WASM to the network
make uploadCode language: PHP (php)
Important: Note the returned WASM hash.
In
contracts/factory/
, update the
SOURCE_ACCOUNT
and the
WASM_HASH
(from the previous step) in the
Makefile
Execute the build and deploy:
cd contracts/factory
# Build the factory contract
make build
# Deploy to the network
make deployCode language: PHP (php)
Important: Note the returned
contract_id
for backend configuration.
Create the
.env
file in
apps/backend/
and fill in the contract IDs and secret keys (for testing):
# Server Configuration
PORT=3000

# WebAuthn Configuration
WEBAUTHN_RP_NAME="Soroban Smart Wallet POC"
WEBAUTHN_RP_ORIGIN="http://localhost:5173"

# Stellar/Soroban Configuration
STELLAR_RPC_URL="https://soroban-testnet.stellar.org"
STELLAR_NETWORK_PASSPHRASE="Test SDF Network ; September 2015"
STELLAR_MAX_FEE="10000000"

# Contract Configuration
WALLET_FACTORY_CONTRACT_ID="C..."  # Factory contract ID from deployment
NATIVE_TOKEN_CONTRACT_ID="CDLZFC3SYJYDZT7K67VZ75HPJVIEUVNIXF47ZG2FB2RMQQVU2HHGCYSC"

# Wallet Configuration
OPEX_WALLET_SECRET_KEY="S..."       # Sponsors fees and funds wallets (must be funded)
RECOVERY_WALLET_SECRET_KEY="S..."   # Recovery account secret key (starts with S)
Code language: PHP (php)| Variable | Description |
| WALLET_FACTORY_CONTRACT_ID | The deployed factory contract address |
| OPEX_WALLET_SECRET_KEY | The secret key of the wallet that sponsors transaction fees and funds new wallets. Must be a funded testnet wallet |
| RECOVERY_WALLET_SECRET_KEY | Secret key, its public key is set as recovery signer on new wallets. Enables passkey rotation for lost access |
The PoC includes additional features:
The complete proof of concept is available at GitHub.
Feel free to: