Scaling AI: A 6-Month Path from Champions to Company-Wide
Douglas da Silva | May 27, 2026

If you’re either a UI designer or a developer, you’ve probably heard of Sketch in the past years – or maybe you’re even using it. Sketch has become a very popular software and broadly used by UI designers. In this article, I’ll show some steps of my workflow when creating and exporting assets to mobile or web applications.
I hope that this article will be useful for designers starting to use Sketch or developers who need to export assets from a Sketch file. If you’re already experienced with Sketch, you’ll probably be familiar with most of the things I’ll be presenting, but you can still get some good insights from this article.
For a long time, UI Designers have been struggling with different tools to create mockups. Photoshop, the most popular software for building interfaces so far, is a photo edition software. It was not created to handle all the specificities of building a user interface. To use it as a tool to develop digital interfaces, you’ll need to re-configure it (eg.: you don’t want to measure your interface with inches), and you’ll be constantly doing some workarounds/using a few of its hundreds of features to build your interfaces. Adobe even tried adding some UI design features to Photoshop, but it is still a huge and memory-consuming software focused on photo edition. Adobe Illustrator has a similar problem: it’s a software focused on vector graphics and printed media.
Meanwhile, Sketch was designed to build user interfaces, and only that. Want to edit a picture? Well, you’ll have some very basic tools here. On the other hand, you’ll be able to design for multiple screen sizes and densities in a very easy way. You’ll also be able to use symbols and text styles, helping in the consistency of the designed interfaces.
Before starting, I’ll list some basic tips and shortcuts for people who need to get some quick information from elements inside a Sketch file.
Hold command (⌘) and click an element. This will directly select an element and avoid the need to go inside each folder with a double click (or to find it in the layer list).

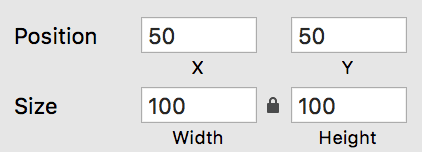
Select an element and its properties will show up.
Select the base element to get distances from, then hold option (⌥) and hover your mouse over other elements or the artboard to get the distances between them.
You can find a complete list of Sketch shortcuts here.
From now on, I’ll be using the icon bar below as an example for the assets exporting. We’ll export these four icons, making sure the assets will have a square aspect ratio, transparent background and each icon will have three pixel densities (1x, 2x and 3x).
If you want to follow the next steps, you can download the sample file here.

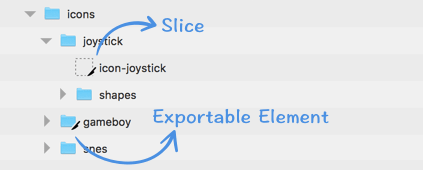
On Sketch, you can create assets in two distinct ways: by transforming an element into an exportable element or by using slices. Both have the same interface when defining size, name and format, but they have a couple of differences: exportable elements will be added to the layer itself (shape, text, folder, etc.) and will be identified with a knife icon in the layer list; slices, however, will create a separate layer and be shown as a dashed outline square with a knife icon.
To define an exportable element, click on a layer or folder to select it, and then click the “+” icon aside of “Make exportable” at the bottom right of the screen.

To define a slice, use the slice tool (Insert > Slice or the shortcut “S” key). Then drag and drop to draw the slice area.

To transform an exportable element into a slice, just click the slice icon in the export interface.

Exportable elements and slices have a few characteristics that make them different from each other. I’ll list some of them below.
Main attributes of an exportable element:
Main attributes of a slice:
Using slices, you’ll notice some options in the inspector:

Since slices sizes are independent from other layers, all assets can have the same width and height. You can even duplicate them (Edit > Duplicate or just hold option (⌥) and drag). If we had set each icon as an exportable element, they would end up with different sizes as you can see below.

You’ll also be able to view slices in the artboards (dashed rectangles) and toggle the visibility of layers and slices.

Every time you create an exportable element or slice, you’ll notice a set of settings of the assets at the bottom of the inspector. These are the steps to set up an asset:

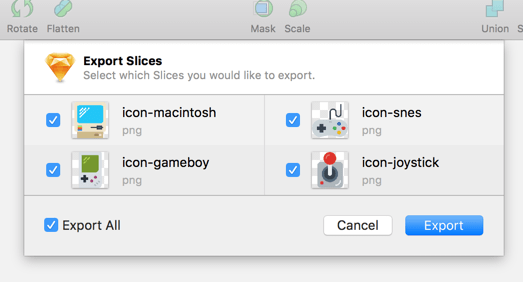
Now that we have all the slices ready to be exported, we’ll select each one of them and click export, right? Nope – there’s an easier way: you can use File > Export… (⇧⌘E) and select multiple slices to export at once. You can also use a plugin like Sketch Measure or a service like Zeplin to do that.
Sketch has a lot of useful plugins for the most varied functions. A really useful one to export assets and specs is Sketch Measure. Besides other features of Sketch Measure, one of the most useful is the Spec Export. It will create an interactive HTML where the developer can just click an element to see it’s specifications and hover on other elements to see their distance. You can check a demo of the exported specs here.
To use spec export you first need to install Sketch Measure plugin. Then select one or more artboards and go to Plugins > Measure > Spec Export. The first time you’ll need to select the resolution, most times Standard @1x px will do the job. Select the destination folder and voilà, you have an interactive HTML and a folder with all the assets that were set up in the document.
Zeplin is a similar service, but it’s cloud-based and with some extra features, like comments. It is also a paid service, but you can use one project for free.
Sketch is a great tool for designing UIs, and you’ll find a plugin for almost everything you need. If you’ve worked with other tools like Photoshop, I’m sure the simplicity and efficiency of Sketch will impress you. Working with projects that include multiples screens densities has become much easier and practical, since Sketch was built to handle assets with these particularities.
I hope you’ve found some useful tips in this article – if you have any other tips or suggestions, please leave a comment below.
Sketch is software designed specifically to build user interfaces. Unlike Photoshop (focused on photo editing) or Illustrator (focused on vector graphics and printed media), Sketch was built to handle the specificities of designing interfaces, allowing designers to work with multiple screen sizes and densities easily, and to use symbols and text styles for consistency.
Exportable elements are added to the layer itself (shape, text, folder, etc.) and identified with a knife icon in the layer list. They always have the width and height of the selected element and won't export anything in the background besides the element itself. Slices create a separate layer shown as a dashed outline square with a knife icon, and allow you to choose whether to export with or without a background color, export group contents only, or trim transparent pixels.
Instead of selecting each slice individually, you can use File > Export… (⇧⌘E) and select multiple slices to export at once. You can also use a plugin like Sketch Measure or a service like Zeplin.
In the export settings, click the '+' icon and Sketch will suggest sizes. You can type any number as a multiplier to the original artboard pixels. If your design was made at 2x pixel density, use 0.5 for 1x, 1x for 2x, and so on. It's recommended to design at 1x. You can also set a maximum width (w) or height (h), such as 50w for a 50px wide asset.
You can use the Sketch Measure plugin. After installing, select one or more artboards and go to Plugins > Measure > Spec Export, then choose resolution (Standard @1x px works most of the time) and a destination folder. This creates an interactive HTML where developers can click elements to see specifications and hover to see distances. Zeplin is a similar cloud-based paid service with extra features like comments, with one free project available.