Smart Contracts: What They Are and How to Build Them for Your Business
Maria Cecília Romão Santos | Jul 08, 2026

Nowadays, images are an indispensable part of the web. However it wasn’t always like that. Only in 1993 the Mosaic browser would introduce images along with content in web pages. Some formats, like GIF and JPEG, already existed in that time and others like PNG and SVG, would only appear in the 90s. Images are used for multiple purposes, like showing pictures, branding, illustrations, charts and many other things.
Because of this variety of use cases and formats, sometimes choosing the right approach can be confusing. Should logos be SVG or PNG? A screenshot, JPEG or PNG? How good the quality of an image can be without generating a file too large? Understanding how each image format works and what are the trade-offs for each one can help answering these questions.
Over the past years, working with both digital design and front-end development, researching and testing different tools helped me to clarify some of these questions. In this article, I’ll show a little bit about how each format works, in which aspects each one is good at and ways to compress and save them for use on the web.
Created by the Joint Photographic Experts Group in 1992, and named after them, JPEG is a lossy raster image format, which means that every time a compressed JPEG is saved, some information will be left behind, irreversibly.
JPEG takes advantage of flaws in the perception of the human eye — we tend to be more sensitive to lightness than to colors — so it uses a compression algorithm that discards information we are not good at perceiving, hence the naming “lossy format”. The amount of compression applied to a given image will be directly related to the quality and size of the resulting file. The technical side of JPEG compression goes far beyond this, if you want to go deeper, check out this article written by David Austin.
Because it works with luminance and color compression, JPEG will work very well for pictures and other realistic or shaded images like paintings and 3D renderings. That’s why it has been the most popular format to store pictures for years. For the same reason, JPEG will have poor results with graphics, like logos, geometric drawings, screenshots, and others.
For being a lossy format, the compression level of a JPEG file will be directly inverse to the final image quality. When saving a JPEG in a tool like Photoshop, you’ll notice a quality setting that goes from 0 to 100. Photoshop describes some ranges of quality:
It’s recommended to work in a range between 50% and 60% on the web, since it will result in a decent quality and a good file size. Metadata can also be stripped from JPEG assets to reduce file size. There are also online tools, like TinyJPG and desktop applications like ImageOptim (Mac) and RIOT (Windows), that can perform compression. In Photoshop, this can be done by selecting “Metadata: None” on “Export” or on “Save for Web ( Legacy)” options. Blurring an image or an area of an image can also result in a smaller file size, as you can check here.
Be aware that, due to JPEG’s lossy approach, saving the same file multiple times, even at 100% quality, will result in a decrease of image quality, as the compression algorithms will be applied over and over on the same image, which might not reflect on a decrease in the file size.
The Portable Network Graphics is also a raster image format, and it’s been around since 1995. It is different from JPEG, in that it’s a lossless format, and the most common lossless format on the web today — , which means that when a file is saved and compressed, no information will be lost due to the compression algorithm.
PNG has a lot of cool features, such as:
For a complete list of PNG features, history and technical information, check libpng’s page.
PNG is really good for line drawings, logos, icons and images with few colors. Pictures and images with a lot of colors, on the other hand, will result in huge file sizes. Another great use for PNG is when you need to use transparent backgrounds. In that case, even for complex pictures, you can still use PNG, since the transparency feature is not present in JPEG.
While the compression algorithms within PNG are lossless, you can elect to reduce its color spectrum and thus decrease size via outside tools. Pngquant is a great tool that does this job, reducing file sizes significantly while keeping its alpha transparency levels. Be aware that this process creates a 8-bit file, which means that the file will have a maximum of 256 colors. It may not seem like much, but it’s possible to achieve good results with that number of colors.

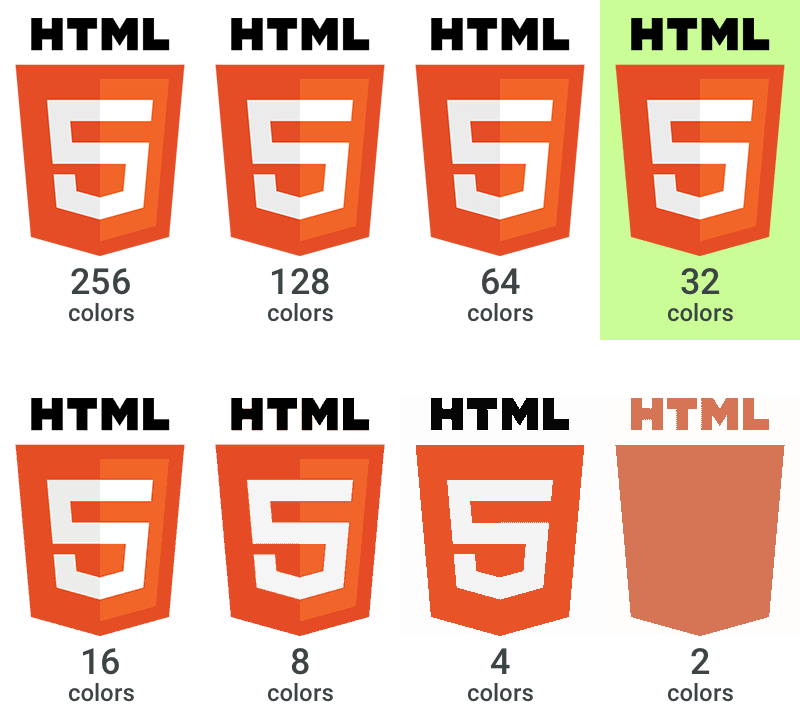
For most PNG use cases (lines drawings, graphics, icons), though, 256 can be more than enough. So, it’s possible to reduce the file sizes even more, by reducing the number of colors in the palette. GUI tools like Pngyu or ImageAlpha, which allow you to preview the resulting file, are a great way to achieve that. Look at the example below how the palette is reduced to 32 colors without compromising its quality significantly. In cases like this, it’s hard to automate the compression because you’ll need to preview and test it until you find the best result with the minimum of colors — and file size. Just like JPEG, there are also online tools for compressing PNG, like TinyPNG.
The Graphics Interchange Format is also a bitmap format and the older among all presented in this article. Created in 1989 by Steve Wilhite, it became the most popular 8-bit image format until PNG was created. GIFs have similar features to PNG but with some disadvantages:
There’s one thing that GIF is famous for and is still broadly used: animations. But, nowadays, even animations can be done in different ways, with much smaller file size: using SVG and Javascript, PNG sprites or the video tag, for instance. So, unless you have a very specific use for GIFs, you should be definitely using PNG or SVG.
Scalable Vector Graphics, differently from the two previous raster formats, and as the name suggests, is a vector format. That means it won’t store pixel based data, but coordinates information that will result in a graphic. SVG vectors use a XML-based structure with tags, just like HTML. Because of this tag structure, you can identify SVG elements with IDs, for example, and manipulate them. This enables a lot of possibilities, like modifying and animating elements with JavaScript, CSS or creating responsive graphics.
See the Pen #1 – Coffee Machine – SVG animation with CSS3 by Jonathan Silva (@jonathansilva) on CodePen.
As other vectors formats, SVG graphics are able to scale to any size without losing any detail or pixelating. The same icon, for example, can be used in multiple sizes and will look sharp in any screen density, like retina displays, without the need of multiple files.

SVGs will play well with line art, logos, icons, illustrations and data visualization. It’s not indicated for realistic images and complex graphics with many details. In some cases, both SVG and PNG will play well for the same purpose. For line art, SVGs will usually result in smaller file sizes. But that’s not a rule, depending on how many anchors a vector has, it can result in a larger file size than PNG, for example. SVG really stands out for data visualization, due to the possibility of using JavaScript to manipulate and create vector animations, libraries like D3 provide an infinity of possibilities.
Most of times, compressing SVG files on the web with SVGz (GZipped SVG), for example, is not necessary. You can (and should) implement this Gzipping on the server, and that would be redundant. What can be done is to reduce SVG files by cleaning unnecessary anchors, elements and properties from the vector shape. Anchors are what a vector shape is made of, and to do this, you’ll need to be sure that the removed anchors won’t affect the final shape of the vectors. If you use Adobe Illustrator to edit SVGs, make sure to save using Export > Export As… instead of File > Save As… because it will create a minified file, among other advantages. In Sketch, make sure not to use unnecessary folders, as they’ll be exported as an extra tag to the SVG.
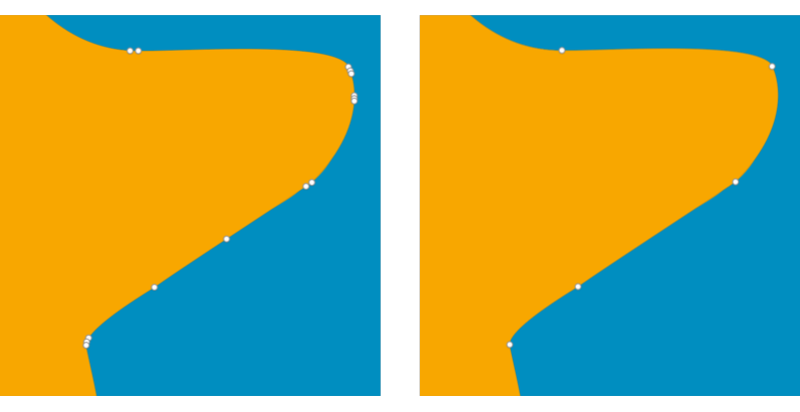
Elements are everything that sits inside a SVG file, including the opening and closing tags. Vector editing softwares like Adobe Illustrator and Sketch may export a SVG with unnecessary elements and properties. SVG minifiers can be used to remove this kind of superfluous information. Online tools such as Compressor and SVGOMG can do this job. If you’re a developer, and not used to SVG cleaning and minification, you may want to check SVGO, a tool that automates this job. If you’re a designer, talk with the project’s developer about SVG minification to avoid doing manual work that can be easily automated.
In the example below, the icon exported from Sketch has 1,364 bytes. The same icon clean and minified takes only 460 bytes — 66% less.
See the Pen SVG from Sketch by Bruno Müller (@brunomuler) on CodePen.
See the Pen Optimized SVG by Bruno Müller (@brunomuler) on CodePen.
As any other piece of technology, image formats are constantly evolving. Our main constraint, as web designers and developers, is browser support. A few years ago, when IE6 was still around, PNG wouldn’t work with alpha transparency. In a near future, maybe we’ll be using new formats like Google’s Webp or others that are still going to be created.
Knowing how to use and optimize each format will ensure a better user experience, as users will be able to preview and receive content sooner, spending less bandwidth. It will also allow new possibilities for designers with animations and responsive pages.
I hope this article helped to clear some questions regarding the many possibilities of image formats on the web. If you still have any questions or suggestions, please leave a comment below or contact me. And if you found this article helpful, don’t forget to share.
JPEG is a lossy raster image format created in 1992 that works well for pictures and realistic or shaded images like paintings and 3D renderings. It uses a compression algorithm that discards information the human eye is less sensitive to. Each time a JPEG is saved, some information is irreversibly lost. For web use, a quality range between 50% and 60% is recommended, as it results in decent quality with a good file size. JPEG performs poorly with graphics like logos, geometric drawings, and screenshots.
PNG is a lossless raster format that works well for line drawings, logos, icons, and images with few colors. It also supports alpha transparency, meaning each pixel can have a different level of transparency, making it the right choice when transparent backgrounds are needed, even for complex pictures. PNG results in huge file sizes for pictures and images with many colors.
While PNG's internal compression is lossless, file size can be reduced using outside tools that decrease the color spectrum. Tools like Pngquant create 8-bit files with a maximum of 256 colors while preserving alpha transparency. GUI tools like Pngyu or ImageAlpha allow previewing results when reducing the palette further, and online tools such as TinyPNG can also compress PNG files. In one example, a logo was reduced from 10 KB (24-bit) to 2 KB (8-bit, 32 colors), 80% smaller, without losing significant detail.
GIF, created in 1989, has disadvantages compared to PNG: it supports only up to 256 colors, has one-dimensional interlacing, poorer compression than PNG, and only binary transparency (pixels are either 100% transparent or 100% visible). GIFs are still widely used for animations, but animations can also be done with smaller file sizes using SVG and JavaScript, PNG sprites, or the video tag. Unless there is a very specific use, PNG or SVG should be used instead.
SVG is a vector format using an XML-based tag structure, allowing elements to be identified with IDs and manipulated with JavaScript or CSS. SVGs scale to any size without losing detail and work well for line art, logos, icons, illustrations, and data visualization, but are not indicated for realistic images or complex graphics with many details. To optimize SVGs, unnecessary anchors, elements, and properties can be removed using tools like Compressor, SVGOMG, or SVGO. In Adobe Illustrator, using Export > Export As… creates a minified file. In one example, an icon exported from Sketch went from 1,364 bytes to 460 bytes (66% less) after cleaning and minification.