Smart Contracts: What They Are and How to Build Them for Your Business
Maria Cecília Romão Santos | Jul 08, 2026

Hi there, I wanted to talk a little bit about my experience with the In app purchase from Google Play. I believe it can be confusing to understand it at first (l surely had some trouble) but once you get to know it better it becomes a great asset.
At first I had trouble configuring the Google Play IAP structure through the google console and once that was done I spent some time trying to setup the sandbox for testing the purchases.
Because I had trouble finding that information, this post will be focused in three topics: first an introduction of Google play IAP services, second a step by step to configure the minimum you need to start testing and lastly how indeed to configure testing correctly. Those who just want information about a specific part of the setup, feel free to jump directly to steps 2. How to configure an app in the google play console or 3. Setup sandbox testers. And if you are a more experienced user of the google play console, you will probably know most of this already
An In app purchase in my understanding is a purchase that happens completely inside an application. In other words, you never leave the app to perform the purchase. There are several tools that can be used to provide the functionality in Android apps but I want to focus on Google’s solution for now.
It is important to remember that Google Play IAP is not able to solve all kinds of problems. First of all, in the documentation it says “Google Play Billing is a service provided by Google Play that lets you sell digital content from inside an Android app or “in-app.” That means that the service is made to enable digital products to be commercialized inside applications. You can’t use iap to sell physical products or services and that can become a limitation depending on your business.
Another important factor is that all purchases made with the system are sent to the account registered in the Google Play Console, which is a complication if we are talking about marketplaces that allow transactions between users.
It is also important to keep in mind the definition of digital products or digital content because there is a fee for selling those products inside applications and that fee is applicable even if you don’t use Google’s solution for the purchases. In my understanding the definition of digital product could be simplified to “digital content that is consumed inside the application”, for instance, a subscription to a newsletter, the purchase of gold coins in a game, the upgrade of app services to a pro account, and so on.
The core reasons I like to use this tool are :
Easy – Google play does most of the heavy lifting. Google has an IAP library that was updated to a new version and nowadays can be imported directly from gradle. To get familiar with it I suggest taking a look at the example provided in the documentation Trivial Drive V2.
Safe – The app side does not handle direct communication with the store. All the communication is handled through an interface provided by the Google Play app (which must be installed in the device for the purchases to work).

Sandbox – The sandbox has evolved a lot since its first release and now it is really good to test and validate the flow. That is mostly because it gives you control of test subscriptions cancellation (Apple’s sandbox really can’t compare in test subscription control) and also because it uses the real purchase flow (You have to input valid purchase data, like existing credit cards and so on, but when the sandbox is active it does not charge).
UI Consistency – Last but not least, it is a good way to provide consistency because any android user who has ever downloaded an app from the google play already knows how the flow works since it is the same.
Aside from that, google play has a lot of tools to manage consumable products, and subscriptions. It also has many features to provide conversion between different types of subscriptions, automatically converting the credits that have been already payed and making the necessary adjustments. Also it is important to notice that In regards to the delivery of content to the user, that responsibility lies completely with us, the service they provide works only for purchase validation.
To start using the Google Play IAP service and be able to send applications to the Google Play store, first you need to have a Google Play Developer Account. Although there is a cost to purchase one of those accounts I find it is worth it in the long run because it doesn’t expire.
Once you have your developer account, to start using the Google Play IAP service inside an application, you need to create an app inside the google play console. The console will generate a public key for your application to identify requests made to their system.
The first setup for the app in the console can be a bit painful but I will put the steps I generally take. First in the initial screen in the Google play console just click “Create Application” and the following dialog should appear.

Choose the application language and name and click create. It will then appear in the applications list in the dashboard as a Draft.
![]()
Note the trash icon in the right side, as long as the application is still a draft it can be deleted. Once it has been published we can only unpublish it but not delete.
After creating the app as a draft, it will already generate the public key needed to be added in the app. To get it, go into the app and find the “Services & APIs” section.
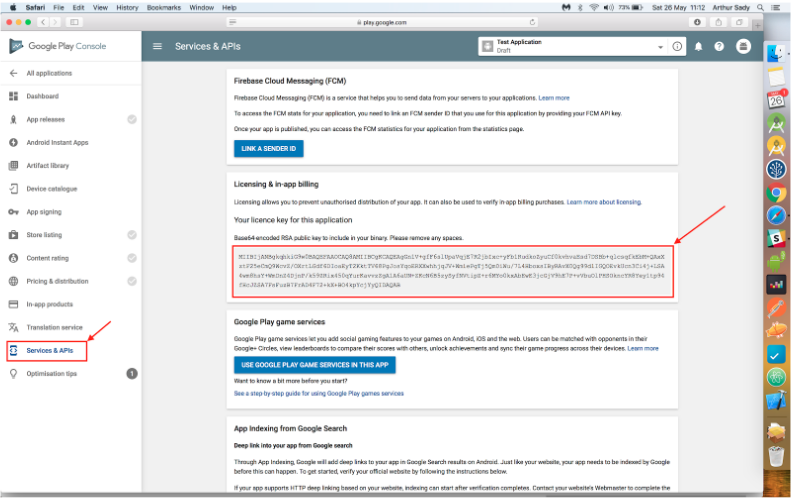
It is important to notice that to complete the first setup of the app, we need an apk file to be put in the console, and the package name chosen for the project can’t be changed afterwards. Therefore choose wisely and setup the IAP lib in the project. The Trivial Drive V2 gives a very good example on how to do that. And to actually test it you will most likely go through this setup with a dummy app.
After setting things in the project and generating a signed apk, remember to save the keys used for signing it, they are important for the future because the console will not accept another signature, I usually store it inside the app folder and put it in the git structure to ensure it won’t be lost if anything happens with my machine or hd.
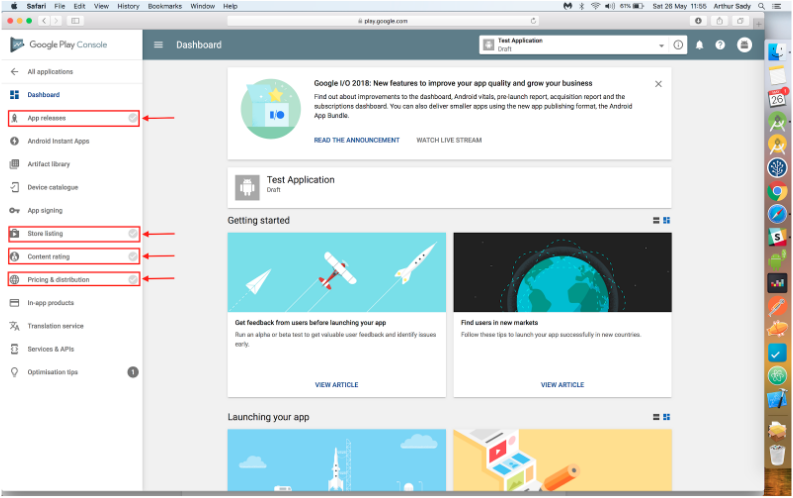
Once you have the apk, there are four steps to be performed to publish the app in an internal testing track. They can be done in any order and are in the sections, “App Releases”, “Store Listing”, “Content Rating” and “Pricing and Distribution”.
In the app release section, go to the bottom of the screen and find the internal test track, click “Manage”, than click “Add Release”.


Google has recently released a service to manage the signing of your app and you will be prompted to decide if you want to use it or opt out. Either way, choose one and then add your apk to the available space (If you opt out you can still sign the service in the future but that will not be as simple). Then fill the rest of the form and click save. Once that is done, you can also click to review, but if all the other steps are not completed, the button to “start the rollout” will be disabled. So we will comeback to this once we finish the other steps.
2. Content Rating
Fill in a valid email and then answer the questionnaire. When finished click “save“, then click “calculate rating” and finally click “apply rating“.
3. Pricing and distribution
Here you gotta decide if your app will be free or not and where it will be available (Don’t forget that if you choose it to be free it won’t be allowed to change afterwards). After that you have to answer another questionnaire. Just fill it in and click save.
4. Store Listing
This item is a little bit trickier than the questionnaires above. To make it simple, you need to fill two descriptions of the app, a short and a detailed one, both of which can be altered in the future so you can put one word in each and it will already be accepted (since these are mandatory fields).
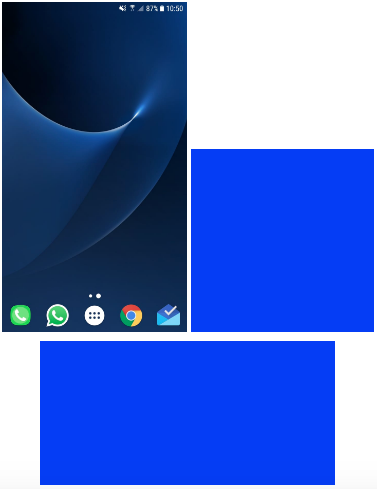
You must provide at least two images from screens, another image for the “hi-res icon” and one for the “feature graphic” totalizing at least four mandatory images. All these images can be changed in the future as well. Because of that I usually use empty prints from a phone, and blanks respecting the sizes requested for the icon and graphic.
After that you just need to choose an application type and category and in the end of the page you can opt to not provide a privacy policy yet (You will need one to do a release but for now that is fine). Then just click save.
If you followed all the steps correctly you should have all the checks marked green like below.
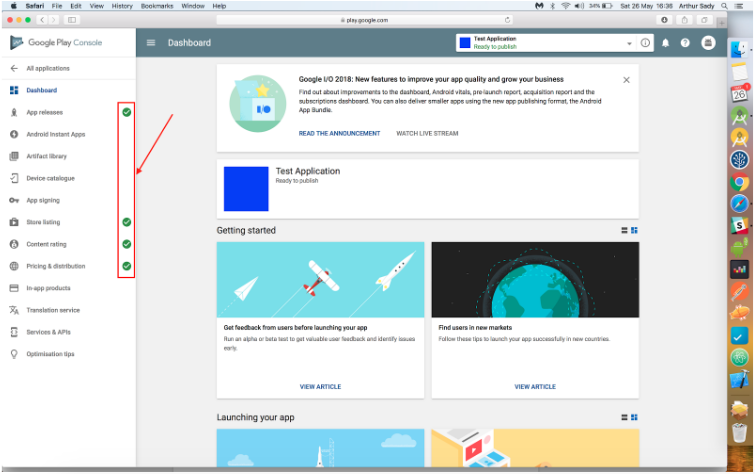
This way you can just go back to the app releases section, find the apk you already put in the internal tests and just click “Review” and then “Start Rollout to Internal Test”. Once that is done, sadly, we must wait about 3h before the apk is truly available (That time is an average and it may be much faster, but I wouldn’t recommend staying still). Which gives us more than enough time to setup the IAP sandbox.
Once you rolled out your apk for internal testing it should appear in the app releases section something like the following:

Click manage again and then drop down the “manage testers” dropdown, select the testing method as internal test and then create a list for testers. And click save. This list will generate an opt in link which must be provided to the testers and they will be able to download the app from google play once they opt in. However being able to test the app does not mean that they will be able to test purchases, at this point, any purchase done in the app will be counted as a real purchase.
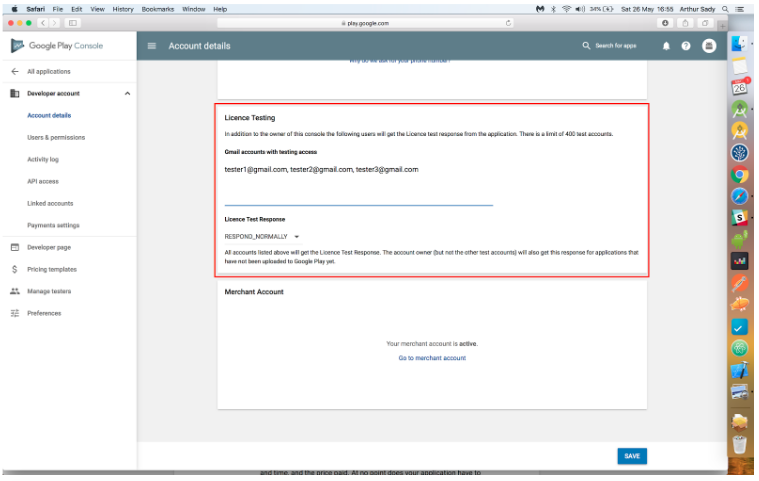
The last step to ensure your testers can use the sandbox purchase flow is a little tricky because its hidden in the general settings of your Google Play Console instead of inside the app itself.
Go to the start screen of your google play console and find in the left menu the settings section, then scroll down to the bottom to find the section “License Testing”. There you just fill in the emails you want to NOT be charged by google play when testing. Any email that is not in this list but is in the previous one will be charged.
Finally with all this set, when the app is processed by google play you can go back to the App release section of your app and get in the manage tester section and there will be a URL for you to send your testers so they can opt in and download the apk.

Now you are all set, you can use the Google Play IAP flow in your app and it should appear close to the example below.
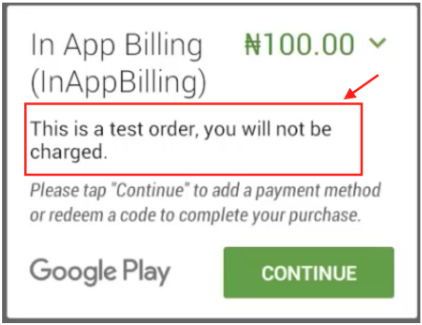
If that message does not show, the purchase will be charged so be careful and warn your testers. For the flow to work you will need real card data so, keep a sharp eye for this detail.
All in all, I think Google IAP is a pretty neat tool and can be useful in a variety of ways. In the post I just discussed it in a shallow manner and apologize if that may cause any displeasure. My objective here was to focus on the initial setup and how/where to configure the IAP test purchases because I thought that setup to be confusing at first and had a difficult time finding the information on the right way to make it work. I hope this helps someone in the future to find that info faster.
Google Play IAP is a service that lets you sell digital content from inside an Android app. According to the post, it is intended for digital products consumed inside the application, such as newsletter subscriptions, in-game currency like gold coins, or upgrading app services to a pro account. It cannot be used to sell physical products or services, and all purchases are sent to the account registered in the Google Play Console, which can be a limitation for marketplaces that allow transactions between users.
The post highlights four core reasons: Easy (Google does most of the heavy lifting, and the IAP library can be imported directly from gradle); Safe (the app does not handle direct communication with the store, since communication goes through the Google Play app installed on the device); Sandbox (an evolved sandbox that allows control of test subscription cancellations and uses the real purchase flow without charging); and UI Consistency (Android users are already familiar with the Google Play purchase flow).
First, you need a Google Play Developer Account. Then create an app in the console by clicking 'Create Application', choosing the language and name. The console will generate a public key found in the 'Services & APIs' section. To publish the app in an internal testing track, you must complete four sections in any order: App Releases (add the APK to the internal test track), Content Rating (fill an email and questionnaire, then calculate and apply rating), Pricing and Distribution (choose free or paid, availability, and answer a questionnaire), and Store Listing (provide short and detailed descriptions, at least four mandatory images, app type and category). After all sections are green, go back to App Releases and click 'Start Rollout to Internal Test'.
After rolling out the APK for internal testing, go to the App Releases section, click 'Manage', open the 'Manage Testers' dropdown, select internal test as the testing method, create a list of testers, and save. This generates an opt-in link. However, to prevent testers from being charged, you must also go to the Google Play Console start screen, find Settings in the left menu, scroll to 'License Testing', and add the tester emails there. Any email not in the License Testing list will be charged for purchases. Real card data is required for the flow to work.
The package name chosen for the project cannot be changed after the first setup. The signing keys used for the APK must be saved, as the console will not accept another signature. If the app is set as free, it cannot be changed to paid later. A draft app can be deleted, but once published it can only be unpublished. After starting a rollout, you typically need to wait around 3 hours before the APK becomes available. Also, delivery of the purchased content to the user is the developer's responsibility; Google's service only handles purchase validation.