Machine Learning Explained: What It Is, How It Works, and Why It Matters for Business
Douglas da Silva | Mar 05, 2026

Cloud computing has brought a revolution to software development, offering unprecedented scalability and flexibility. But this freedom comes at a price — literally.
At Amazon Web Services (AWS), the “pay-as-you-go” model allows you to create resources quickly. However, if you don’t have a clear strategy, costs can soon spiral out of control.
This is where FinOps comes in.
FinOps is a practice that unites finance, operations, and technology to optimize every penny invested in the cloud. At Cheesecake Labs, we’ve already seen the power of FinOps in action. While working with Vesseo’s “digital dollars” blockchain-based wallet, we helped them reduce their AWS bill from $5,800 to $3,000 a month — a saving of almost 50%.
How did we do it? With practical techniques and native AWS tools that any team can use. In this post, we’ll explore detailed strategies for cutting costs without sacrificing performance or innovation. Let’s dive deep into each one!
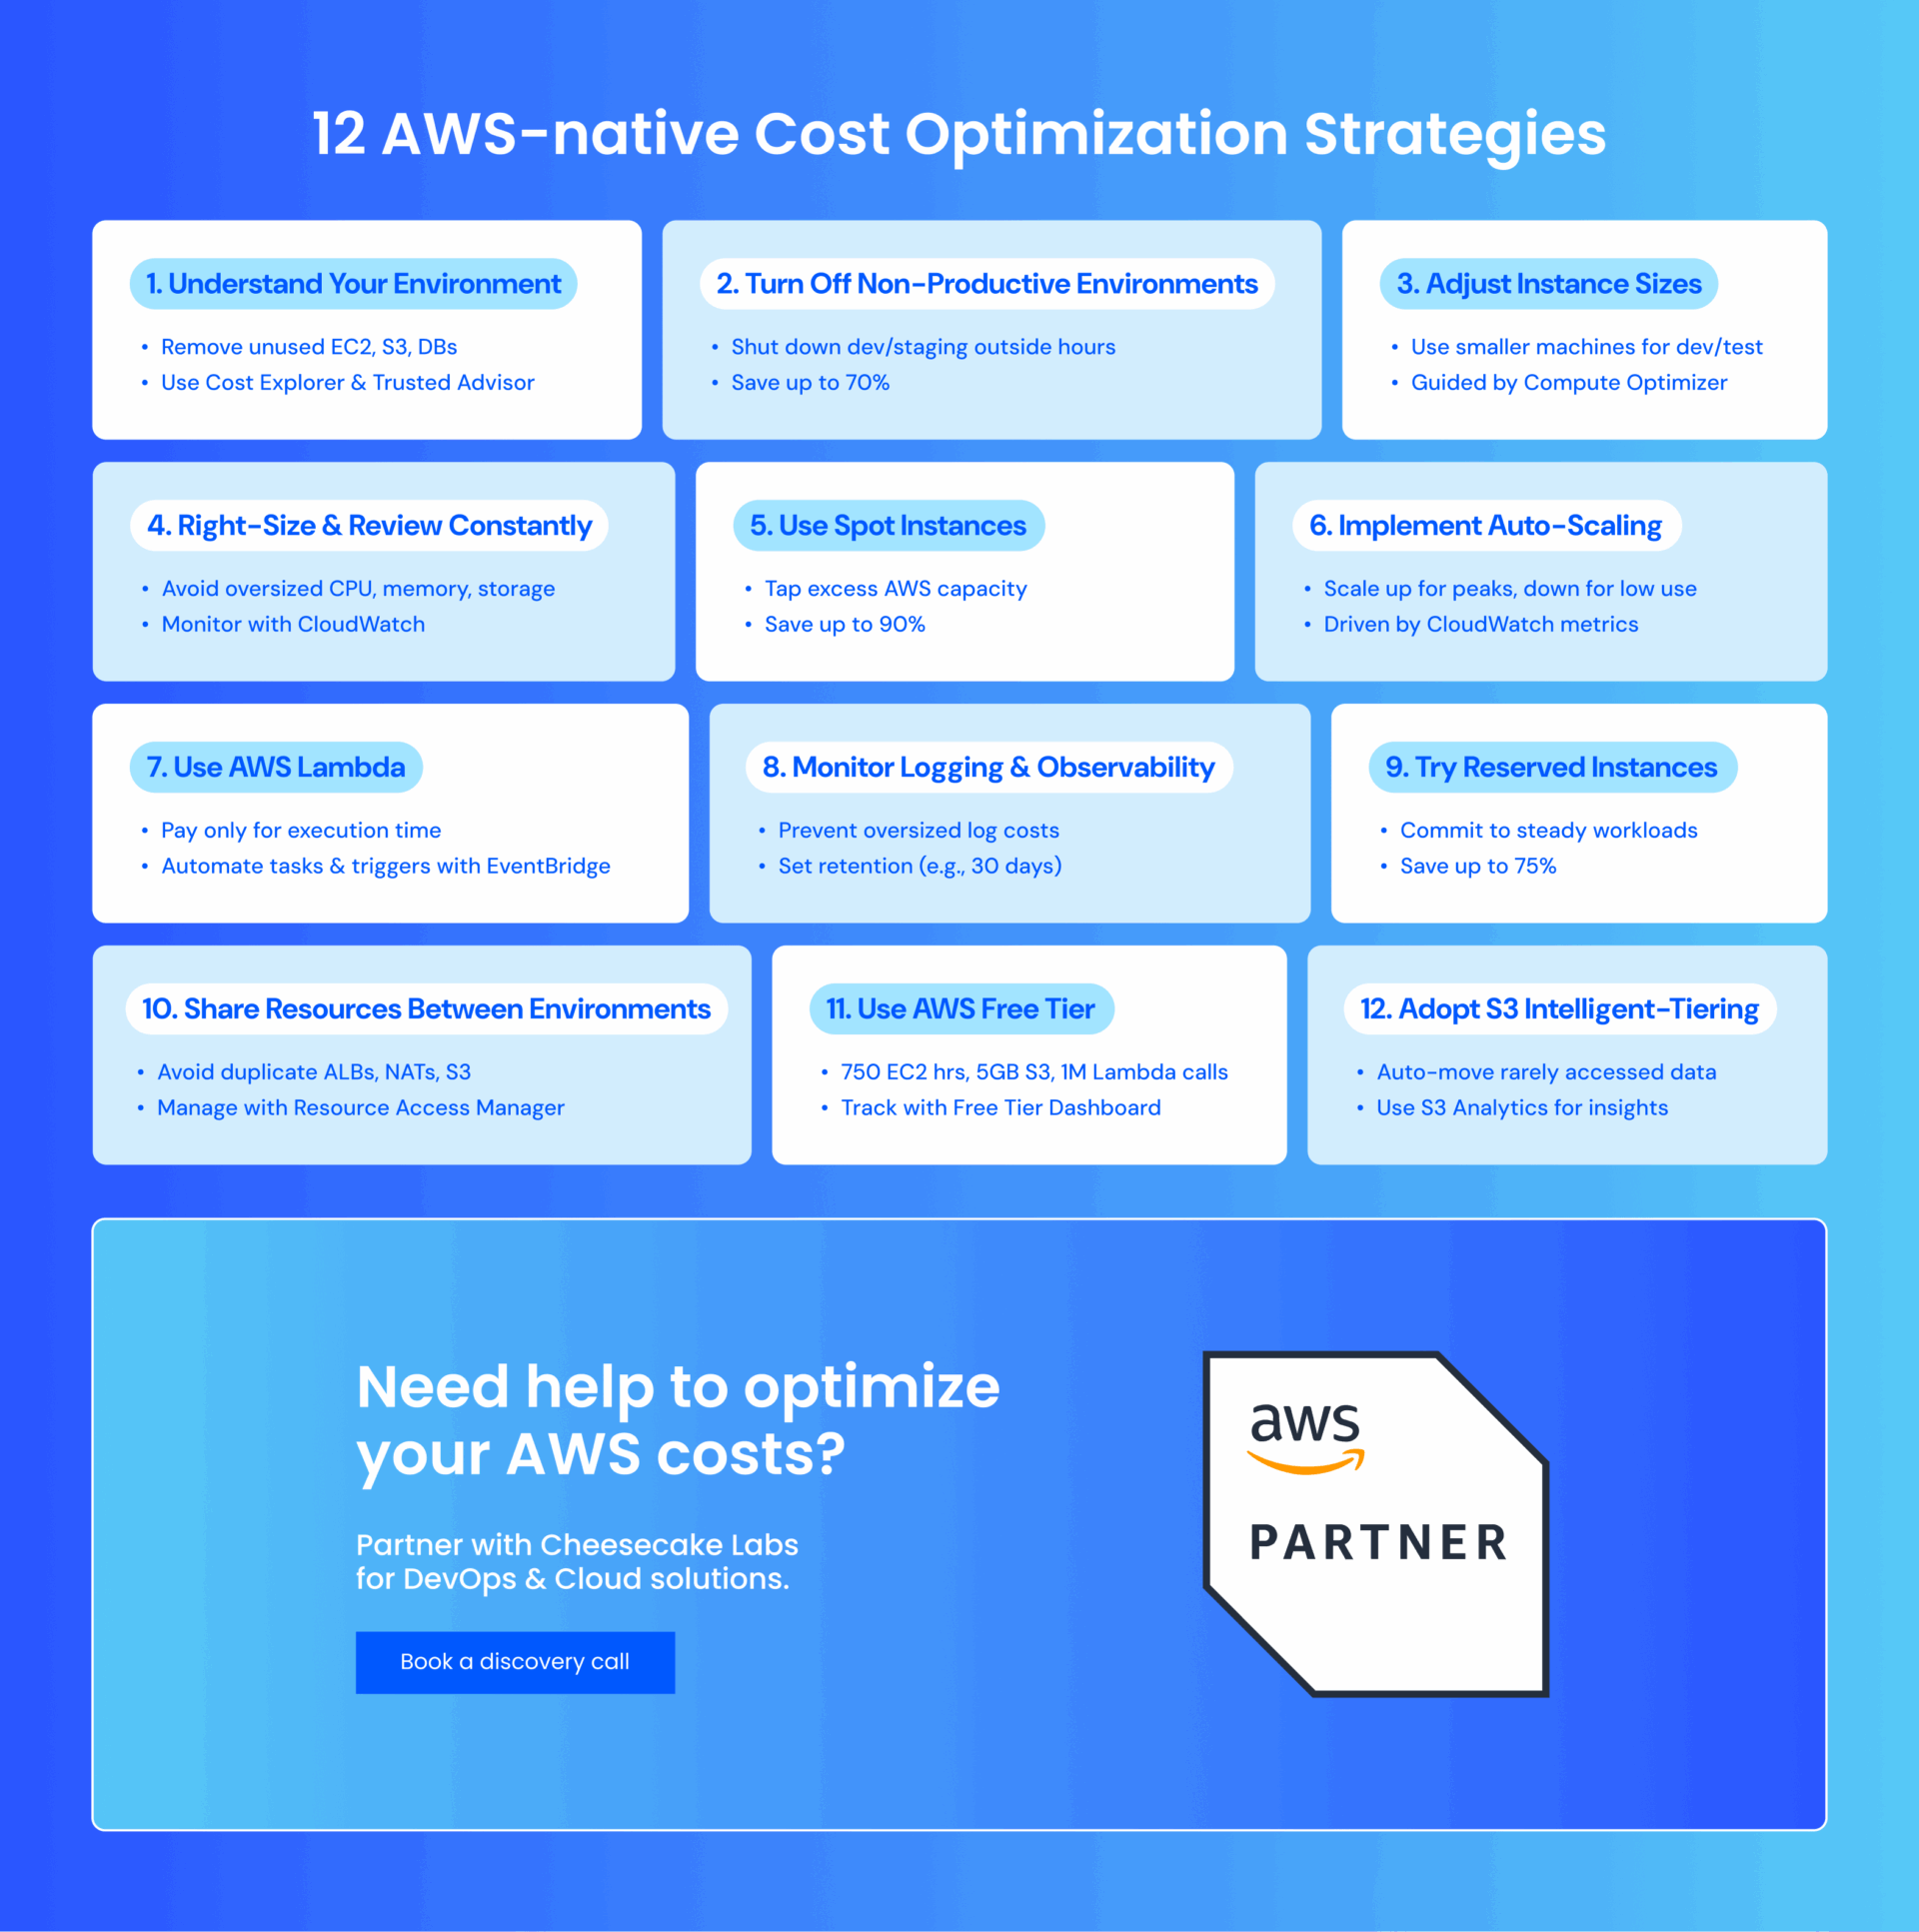
Ultimately, FinOps isn’t just about cutting costs — it’s about understanding where your money is going and holding teams accountable for how they use cloud resources. Achieving that starts with visibility.
The following tools and practices help you tag resources, track spending, and establish guardrails so that everyone, from finance to engineering, works from the same data and stays aligned on costs.
Knowing where the money is going is half the battle. Cost Allocation Tags allow you to tag resources with metadata such as “project”, “team”, or “environment”.
AWS Cost Explorer can use these tags to generate detailed reports, showing, for example, how much the dev team spent on EC2 versus S3.
You can activate tags in AWS Billing and Cost Management and standardize their use. It’s a simple practice that brings full visibility to costs.
Tagging attaches key metadata to every resource to help you make sense of your AWS environment. It lets you track ownership, link spend to specific teams or projects, and filter out unused or orphaned resources before they inflate your bill.
Here’s some key advice about how best to use tags.
Start by defining a few tags required across your environments:
Tagging every resource with these four elements gives your finance and ops teams the context they need to manage spend effectively.
When you make these tags mandatory from the start, you can avoid mystery charges and establish clear ownership trails so that you don’t have to chase down orphaned resources later.
Manual tagging becomes harder to manage as your environment grows because it’s too easy to miss tags or apply them inconsistently. Automation solves this by assigning the right tags from the start, without relying on people to remember.
You can automate tagging using three common approaches:
Tags only become useful when they feed into your reporting tools. If your tags are clean, you can break down your AWS spending however your finance, product, or engineering teams need to see it.
AWS offers several built-in tools to help you turn tag data into insights:
Controlling costs is easier when you have a plan, and AWS Budgets is the perfect tool for this. With it, you set spending limits per service, project, or period and receive alerts if you come close to exceeding them.
For example, you can set a budget of $1,000 per month for an environment and be notified when an unexpected spike threatens to exceed the limit, allowing for quick adjustments.
You can also create budgets in AWS Billing and Cost Management and integrate them with Cost Explorer for forecasts based on history. You can set up notifications via email or SNS to take action before costs skyrocket.
Budgets also support customized reports, such as “spending by team”, helping keep everyone in line. It’s like a financial guardian for your cloud.
In addition to the tools we’ve already covered, AWS offers several specialized services that can help you track, analyze, and improve cloud cost performance. These are especially useful as your FinOps practices mature and you need greater visibility or automated anomaly detection.
Here are a few bonus tools to explore:
AWS FinOps tools vs. third-party FinOps tools
While AWS gives you lots of tools to track and optimize cloud costs, they’re not the only options. You can also use third-party platforms or tools across multiple cloud providers.
Here’s how the native AWS FinOps tools stack up against other options:
| Category | AWS FinOps Tools | CloudCheckr | CloudHealth by VMware |
| Features | Native cost tracking, ML-based forecasting, and tag-based reporting | Multi-cloud visibility, cost optimization, and security insights | Multi-cloud spend tracking, forecasting, and compliance features |
| Pricing | Core tools are free. QuickSight and Forecast are billed separately. | Requires a separate license. Cost scales with usage. | Premium pricing based on license and usage volume |
| Integrations | Deep AWS integration (IAM, CUR, Athena, Tag Policies) | Supports AWS, Azure, GCP. Requires manual setup. | Multi-cloud support. Weaker AWS-native integration. |
So, which tools should you use?
If you’re already using AWS, its built-in tools often integrate more easily and cost less to maintain. They also require less setup and no data transfers, so you can start tracking spend and spotting savings opportunities right away.
Now that we’ve looked at a full range of AWS-native tools, third-party options, and budgeting tactics, it’s helpful to step back and assess your overall maturity when it comes to cloud cost management.
You need to ask yourself, “How mature is your organization’s approach to cloud cost management overall?”
The AWS FinOps Maturity framework helps your team understand where they are today and identify the next steps to improve visibility, accountability, and cost efficiency. Whether you’re just starting out or are already using automation and real-time insights, understanding your stage can guide smarter decisions and long-term strategy.
Here’s a breakdown of each stage and what to focus on as you grow:
| Stage | What it looks like | Steps to take |
| Crawl | Basic awareness of cloud costs. No formal processes. Actions are reactive. | Track basic usage |
| Attribute spend by team or project | ||
| Build simple reports | ||
| Set baseline budgets | ||
| Walk | Structured processes start taking shape. Teams use reporting and policies. | Improve cost allocation |
| Rightsize underused resources | ||
| Forecast spend using past data | ||
| Set basic policies and alerts | ||
| Run | FinOps is integrated into operations. Most processes are automated. | Automate tagging and reporting |
| Adjust usage and commitment plans | ||
| Use real-time dashboards to monitor cost impact | ||
| Optimize | Cost accountability is fully embedded. FinOps drives product and engineering decisions. | Expose cost data during development |
| Include cost in roadmap planning | ||
| Tie forecasts to growth and revenue plans | ||
| Continuously review usage | ||
| Hold teams accountable for spend |
In the crawl stage, there’s usually no formal process in place — as a result, you might scramble to explain overruns when cloud bills come in higher than expected. Or maybe you review costs manually without truly understanding where the money is going (or why).
To move forward, you need to start building visibility. Begin by tagging resources to track who’s spending what. Assign costs to teams or departments and set up simple reports that show usage patterns and early spending trends.
Next, create policies to guide how and when resources should be used. Start allocating costs at a more granular level — by project, service, or workload — and use tagging and reporting tools to identify idle resources. Begin rightsizing infrastructure based on actual usage trends. This is also the time to review historical spending and build simple forecasts that account for upcoming growth.
At this stage, cloud cost management is already embedded in your day-to-day operations. Your teams make decisions based on real-time data rather than monthly reports.
To keep costs in check as you grow, automate everything you can: set up automatic tagging when new resources launch, schedule regular cost and usage reports, and use tools that automatically adjust instance types or shut down idle resources.
Replace reactive budgeting with forward-looking forecasts based on reliable data to spot cost spikes early and plan for future demand. Make cost reviews part of development planning so your teams can weigh tradeoffs before building.
By the time you reach this stage, cost awareness is built into how your teams work. Every decision, from design to deployment, runs through a cost lens.
For example, engineers verify how a new feature or configuration impacts service-level spend before merging the code. Product managers use historical usage data and cost-per-unit metrics to estimate the financial impact of new features and then adjust scope, timing, or design based on that analysis.
This level of accountability requires better systems. You should replace static reports with real-time dashboards that show spending as it happens. Forecast costs based on your actual product roadmap, and update them as plans change.
The goal is to give teams the data they need — when they need it — to make cost-aware decisions in real time.
Reducing costs on AWS isn’t just about saving money — it’s about using the cloud intelligently. FinOps is a continuous cycle of analysis, adjustment, and optimization.
To get things right, start small: map out your environment, try one of these techniques, and use AWS tools to your advantage.
These strategies, paired with the right AWS FinOps tools, give you a solid foundation for managing and reducing costs long-term. But the most successful FinOps efforts don’t happen in a vacuum — they’re driven by clear ownership, consistent processes, and expert support.
As an official AWS Partner, Cheesecake Labs has access to exclusive training, certifications, and the latest AWS solutions. That means we can help you go beyond basic optimization and build a truly scalable, cost-effective cloud environment from initial setup to ongoing improvement.
Whether you’re looking to migrate, modernize, or refine your existing AWS architecture, our team of experts can help you design, build, run, and scale with confidence.
Tell us about your AWS goals and see how Cheesecake Labs can help you drive better performance, visibility, and ROI in the cloud.
FinOps helps you keep cloud costs under control as you scale on AWS. It lets you track usage and spot inefficiencies early, forecast spending based on real data, and tie costs back to the teams using the resources to establish accountability.
It all depends on your setup. AWS-native tools like Cost Optimization Hub, Cost Explorer, Budgets, and Cost and Usage Reports often work best for teams that are already in the AWS ecosystem. They plug directly into your AWS environment and don’t require extra setup, connectors, or separate licensing fees like many third-party tools do.
Reserved Instances (RIs) lock in discounts for specific instance types and regions. They’re ideal if your workloads are steady and predictable over time.
Savings Plans let you change instance types and still get discounts based on a committed spend per hour, so they are often better if your compute configurations tend to change over time or across projects.